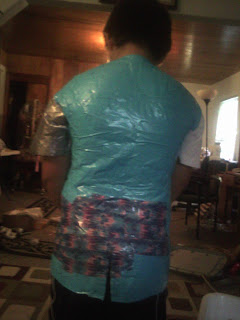
Duct Tape Dress Form Take 1
I’ve wanted a dress form for a long time now but didn’t want to spend a substantial amount of money on one for two reasons. I gained quite a bit of weight that I’m currently trying to lose, and I didn’t want to have to go out and buy another form once I shed the last of the unwanted weight. Then I read in the new THREADS “Teach Yourself to Sew Magazine” directions for a tape form. Now, ordinarily I wouldn’t pay much mind to such a thing. However, earlier this year there was an article in the Columbian that interviewed two local teenagers who were making their prom dresses from only black, blue, and purple duct tape. The dresses weren’t ugly, in fact these young ladies made some fashionable get ups. After the article came out, stores local to the Vancouver area started carrying colored duct tape in patterns and solid colors. Because I had previously read the Columbian article I knew that a tape dress form could become a reality.
Then the new Threads Fall2010 Teach Yourself to Sew came out, and featured an article on taped dress forms that are both fashionable and functional. I decided I needed a victim to try this out on before doing one for myself. My daughter is over at her Aunties house (You’re saved for now Mahaylah), but Diego is home and willing (Until the tape was applied that is!).
Ok so here he is very happy about the new project.
Getting him to agree to it was the easy part. Getting him to sit still so I could finish was so beyond hard…
At this point Diego is not restless, the tape is being applied loosely. He doesn’t know what’s coming after this J…
I purchased 20 yards of tape. Threads suggested 60 yards of 2” tape for size 10 adult women. I figured 20 yards was perfect for an 8 year old boy. I purchased 10 yards of 45 mm grey duct tape brand tape, and 10 yards of a colored duct tape brand tape. I was all set to begin.
At this point I did not purchase the cotton batting to stuff the form with since this was just an experiment. You tape the body with the t shirt on which becomes the mold once you cut it off of the body.
I began applying the grey tape first. This is my first layer of tape. Tape is applied front and back. I did the natural waist first although I didn’t post a picture of that step
At this point I had already applied the colored tape which isn’t shown in this picture all over the back, and part of the front. I then ran out of colored tape. So I ran to the store and purchased an additional roll of fluorescent blue tape. This is colored tape just like the other roll, and is used for designs such as prom dresses. I then started filling in the areas that needed a 2nd layer of tape. Only to find out that the dress form looked funny with two colored tape verities. So I started applying a 3rd layer of just the taping a 3rd layer of just the fluorescent blue.
As you can see Diego is no longer happy. Previous to this he decided he’d had enough and attempted to cut the body suit off of himself with dull scissors. Then decided he’d let me finishJ
The next step is to look for any layers that need filling in. By the 3rd layer I had applied the tape very tight so the mold would form. You can see in the back I ran out of blue tape so I just left it as is. Diego thought it looked cool. My hands hurt at this point, and I’m done. I begin cutting up the back to remove the mold.
Mold is cut completely, and I then take the mold off. At this point a person would then stuff the mold, and re-tape. I chose to tape it back up and hang it for later stuffing since I didn’t have cotton batting on hand.
I did not take a side picture but from the side you can see all the indentations, the buttocks, stomach, shoulders. The tape mold held together great, and successfully molded exactly has his body is. This front photo you can clearly see the chest and stomach indentations.
.
WHAT DID I LIKE? I love the method. It is cost effective considering a store bought dress form which you have to mess with to get it to your body shape costs anywhere in the $200’s and up. This form cost me $15.47 without the stuffing. I did purchase extra grey tape when I went for the blue tape. So the final yards of tape I used were 50 yards. The form is sturdy though, so I believe 50 yards was worth the effort.
WHAT WOULD I DO DIFFERENTLY? I would spend more time on the shoulders, and maybe extend the arms a bit. I might make a form with thighs as well for me, and my daughter. That way I can fit pants better to. I would purchase all supplies ahead of time, and ensure I have enough supplies. I would prepare tape strips a head of time and have a partner cutting strips while I tape the form.
Sources
THREADS Magazine: Teach Yourself to Sew, fall 2010, pg 33-35.


No comments:
Post a Comment