Wednesday, December 29, 2010

FSL: Christmas Decorations

FSL: Christmas Decorations
As part of my yearly cookie gifts I decided to make some free standing lace ornaments to attach to each baggie of cookies. What I thought would be a easy present turned into a nightmare. The FSL kept caving in because my wash away mesh wasn’t strong enough. I had to fold three layers to get them to stitch out, and even then it was touch and go. Eventually I got through it, and they were a hit. Here are some steps to take if you decide to make these.
1.    I would use Vilene or another wash away that is not thin. The wash away should feel sort of like fabric. I used sulky, and it just didn’t do it for this project. I would not use that brand in the future for this type of project.
2.    Wash away is expensive. So to save money you can keep the stabilizer on its roll and just keep hooping as close to the old design as possible without affecting the designs. If you have a big project you may not want to hoop into the old design. I did hoop into it at times to save space and my designs were not affected. If the design you are stitching out is a long stitch count you wouldn't want to do that. The process could give the design hoop burn from the stitch motion.
3. To save time, get everything you need next to your workspace. That way you can easily switch designs and colors fast. If you have software , you can combine designs in the same hoop, so more than one ornament will stitch out.
How to wash away the stabilizer: Get a bucket of warm water and simply soak the designs in it for 30 or so minutes or until all wash away has dissolved.


Sunday, December 19, 2010

New Toys!

NEW TOYS
I have new toys to report. DH bought me a dress form for Christmas. The form’s a dream come true. The little time I’ve had it I’ve found it's not only useful in the sewing room, but also useful to preoccupy my children. My youngest constantly pokes at it and asks me if I feel it. I believe he’s getting this idea from “voodoo”, where he heard this I do not know. And then, my DH tells me that when I stepped out to drop my daughter off somewhere DS came running out of his room to show me something. Tapping on the form (she’s dressed in clothing at the moment, but apparently her not having a head doesn’t matter much) mom, mom, mom guess what. DH said our son was a little embarrassed over it. Anyway it’s a Dritz surefit. Stay tuned for a review later.
New Feet! I purchased 3 new feet for my Pfaff last week. I was surprised to see them in the mail this morning.  I honestly didn’t think they’d be here until after Christmas. Sew-Classic is a saint for her fast shipping! The feet appear to be good quality also; adjustable binder, felling foot, and knit edge piping foot.
The knit edge will be used this week. I’m making my daughter a wool knit blend sweater dress.

Monday, December 13, 2010

Simplicity 0493/2603

2603 Cover/Back


                                                        0493 Cover and Fabric Choice.
                                                    A nice sweater knit in Floral plum for the cardi, and a dark purple
                                                                         knit for the top
 First up though, I have the first cardi I did in a low quality mystery knit. This one was made in View A, the long version. It's dark blue and has an eyelet design all over it. It is very very stretchy, a 4 way. My machine, even with the IDT did not want to sew this fabric. It kept eating it. I had to resort to wedging tissue paper in all the seams just so I could get it sewed. I'm not talking just the start of a seam, no, I mean I had to literally cut strips of tissue and nudge it inside all the seams before sewing. This cardi was my test run before sewing my lovely sweater knit. I did make some mistakes. I sewed the arm seam up instead of under the arm. I need to fix that. I'm not looking forward to picking the stitches on this fabric.
 The following photos are ways you can wear the cardi.I did find that view A is too long for my taste. My body shape will not take well to tying the extra fabric around me. I just look huge!


So once I figured out all my tweaks I decided to get cardi # 2 done. This is the floral plum fabric in a soft sweater knit. I love this fabric, and wish I would have written down  exact name so I could go back and buy different colors. Anyways. I made some changes. I did view c which is a short drape, and shorter sleeves. I did not add the elastic to the back neck. For this fabric it didn't need it. I also made sure to sew the sleeves right. HOWEVER, I did mess them up twice and had to pick stitches and resew TWICE! you'd think I would have learned the first time. Yikes.

 Knit sleeveless top view E. As you can see the neckline is different than the patterns. I some how stretched the fabric out when sewing the neckline, and it wouldn't lay flat; even after washing/drying and ironing the heck out of it. So I added a second piece of the neckline, and that did help flatten it out, but i still wasn't satisfied. So I got my trust pfaff 7570 out and did a old school maxi design right onto the stitching, and then took it around back. I love the way it turned out.

 You can see the neck design a little better here, but the next photo is a better closeup.

I'm pleased with the neck design. When it's worn the neckline is really pretty.

Did it look like the photo: Yes it did
Likes: I love the different variations to the drape. I loved the sleeveless top, and it took well to my changes
Dislikes: Didn't like view A's drape length. It's long and bulky. It's not something I'd wear all year round, but it is something I'd wear once in a while.
Sew it again: Definitely!

Tuesday, December 7, 2010

SWAP update
I got my fabric from fabric.com today. OH my goodness, the fabric is to die for. I am very pleased. There isn’t a single piece that I’m not happy with; which is saying a lot since ordering online can be tricky. I’ve done the eBay thing and haven’t always been pleased. In fact I’ve often come out either scammed or extremely pissed off at the miss judgment in the fabrics quality.
Ok, so here are the photos of my lovely fabrics minus one. The best fabric, lovely light weight sweater quality mohair can’t be shown. Little elves read my blog every morning before school. No child, you won’t be finding this one, but I did just give you a tease. That IS if you can figure out what the word “mohair” means…
Anyways, these fabrics will be used for SWAP 2011. I’m still deciding on my plan of action. I hope to finalize it soon. I have some ideas though, and have finalized a couple items. I have one more lot of fabrics planned from fabric.com, and possibly a lot from another online company that I heard gives out 10 yard bonus packs with a certain dollar amount spent:) I still need notions: zippers, thread, possibly wide waist elastic, and a few others. Also need linning material for jacket.

Eyelash Sweater Knit in Black 50% Polyester, 50% Acrylic 
Garment: Sweater
                       Designer Boucle Suiting in Jessica Plaid Tan/Red 62% Rayon, 29% Acrylic, 95 Nylon
                                                               Garment: Suit Jacket
                                      Wool Blend Suiting in Brown/Black 80% Wool, 20 % Nylon
                                                         Garment: Hopefully Pants and Skirt
                                      Wool Blend Knit in Olive/Silver 80% Wool 20% Polyester
                                                  Garment: Possibilities include Turtleneck or T-Shirt

Thursday, November 25, 2010

Winter Capsule, SWAP

Winter Sew-A-Long is going slow. I need to do 1 more item before December to stay on tract, but I’m finding it hard to do so. I guess I need to just make the time. I definitely need to get a head of the game so I can devote more time to planning for SWAP.  If I play it out well I may be able to use the SWAP trouser in my winter sew-a-long since the winter thing ends in January, and SWAP starts next month. I’ll have to check if that’s allowed. If it is, then I’ll be set.
My SWAP needs to be an add-on to the items I make in the winter sew-a-long. My plan is to have a working wardrobe that can take me through a week or two of work. The wardrobe needs to have enough pieces that allow me to alternate weeks, and not look like I’m wearing the same old outfits every week. I want a mix of heavy and light woolens and wool blends, and light weight layering items from my winter project. I also want a mix of working-casual and corporate professional since I’ll likely be working my current position, and taking on a new field (so two jobs, one wardrobe). My current position requires infrequent “professional” meet and greets, and clients. My new field is in social services, and will likely require a professional yes casual wardrobe with occasional corporate dress.
That’s all for now,
Emily

Saturday, November 20, 2010

Belly Dance Creations


I thought it would be neat to show off some of the belly dance costumes i've done in the past. So here they are. My daughter's been dancing since she was just 2 years old; she's 11 now. These are a few years old, but they are still really pretty costumes. Very simple to make compared to what she wants now days:)


Tuesday, November 16, 2010

Plans for SWAP 2011

                Update: I decided I will be doing two swaps this year. The following swap, and a second swap for my daughter in plan 1: 6 tops, 4 leggins/jeggins, 1 vest as the optional.              
SWAP 2010: My Sewing With a Plan

Option 1: 6 top, 4 bottoms, and 1 choice. 3 Items may be pre purchased or pre made. All items sewn must have a “haven’t mastered” technique.

Bought items
1. Black Trousers
2. Black knit dress with floral chiffon inserts (sleeves and collar): red, green, orange, and brown floral colors
3. Red Long sleeved Tunic w crystals on arms. 50% Ramie & 50% acrylic
Choice item: Suit Jacket in Boucle Suiting blend

Bottoms slacks/skirts in black/brown wool, black wool.


Sunday, November 14, 2010

Winter Sew-a-Long, SWAP

I am participating in my very first “full” sew-a-long and am excited. I’ve chosen to sew two cardi wraps in knit (one dark blue light weight knit, one floral heavy weight sweater knit), two sleeveless tops ( one dark purple and the other possibly black), a pair of dark trousers in a cotton/linen, and to shorten and perhaps do some major altering of a wool coat I have.
I completed one cardi wrap thus far, and had one throw-a-way sleeveless top. My game plan is to make two shirts in November, two in December, have the pants done by January, and finish the coat by February. If I follow my plan exactly then I will have some wiggle room for mistakes.
I have other news to share. I will also be participating in a thing called SAWP, which stands for “sewing with a plan”. This is a contest (?) offered through the Stitcher’sGuild every year. The rules this year are a bit frightening but I think I’ll survive if I stick to a game plan.
More to come: Look for my SWAP 2011 blog that will be posted next month, and my Winter sew-a-long pictures coming soon.

Sunday, October 31, 2010

Get in Form, Threads Review

Duct Tape Dress Form Take 1
I’ve wanted a dress form for a long time now but didn’t want to spend a substantial amount of money on one for two reasons. I gained quite a bit of weight that I’m currently trying to lose, and I didn’t want to have to go out and buy another form once I shed the last of the unwanted weight. Then I read in the new THREADS “Teach Yourself to Sew Magazine” directions for a tape form.  Now, ordinarily I wouldn’t pay much mind to such a thing. However, earlier this year there was an article in the Columbian that interviewed two local teenagers who were making their prom dresses from only black, blue, and purple duct tape.  The dresses weren’t ugly, in fact these young ladies made some fashionable get ups. After the article came out, stores local to the Vancouver area started carrying colored duct tape in patterns and solid colors. Because I had previously read the Columbian article I knew that a tape dress form could become a reality.
Then the new Threads Fall2010 Teach Yourself to Sew came out, and featured an article on taped dress forms that are both fashionable and functional. I decided I needed a victim to try this out on before doing one for myself. My daughter is over at her Aunties house (You’re saved for now Mahaylah), but Diego is home and willing (Until the tape was applied that is!).
Ok so here he is very happy about the new project.
Getting him to agree to it was the easy part. Getting him to sit still so I could finish was so beyond hard…
At this point Diego is not restless, the tape is being applied loosely. He doesn’t know what’s coming after this J

I purchased 20 yards of tape. Threads suggested 60 yards of 2” tape for size 10 adult women. I figured 20 yards was perfect for an 8 year old boy. I purchased 10 yards of 45 mm grey duct tape brand tape, and 10 yards of a colored duct tape brand tape. I was all set to begin. 
At this point I did not purchase the cotton batting to stuff the form with since this was just an experiment. You tape the body with the t shirt on which becomes the mold once you cut it off of the body.
I began applying the grey tape first. This is my first layer of tape. Tape is applied front and back. I did the natural waist first although I didn’t post a picture of that step

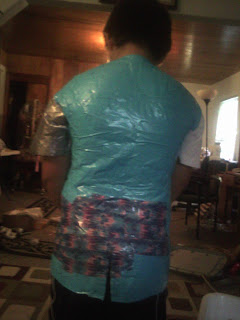
At this point I had already applied the colored tape which isn’t shown in this picture all over the back, and part of the front. I then ran out of colored tape. So I ran to the store and purchased an additional roll of fluorescent blue tape. This is colored tape just like the other roll, and is used for designs such as prom dresses.  I then started filling in the areas that needed a 2nd layer of tape. Only to find out that the dress form looked funny with two colored tape verities. So I started applying a 3rd layer of just the taping a 3rd layer of just the fluorescent blue.
As you can see Diego is no longer happy. Previous to this he decided he’d had enough and attempted to cut the body suit off of himself with dull scissors. Then decided he’d let me finishJ

The next step is to look for any layers that need filling in. By the 3rd layer I had applied the tape very tight so the mold would form. You can see in the back I ran out of blue tape so I just left it as is. Diego thought it looked cool. My hands hurt at this point, and I’m done. I begin cutting up the back to remove the mold.

Mold is cut completely, and I then take the mold off. At this point a person would then stuff the mold, and re-tape. I chose to tape it back up and hang it for later stuffing since I didn’t have cotton batting on hand.

I did not take a side picture but from the side you can see all the indentations, the buttocks, stomach, shoulders. The tape mold held together great, and successfully molded exactly has his body is. This front photo you can clearly see the chest and stomach indentations.
.

WHAT DID I LIKE? I love the method. It is cost effective considering a store bought dress form which you have to mess with to get it to your body shape costs anywhere in the $200’s and up. This form cost me $15.47 without the stuffing. I did purchase extra grey tape when I went for the blue tape. So the final yards of tape I used were 50 yards. The form is sturdy though, so I believe 50 yards was worth the effort.
WHAT WOULD I DO DIFFERENTLY? I would spend more time on the shoulders, and maybe extend the arms a bit. I might make a form with thighs as well for me, and my daughter. That way I can fit pants better to. I would purchase all supplies ahead of time, and ensure I have enough supplies. I would prepare tape strips a head of time and have a partner cutting strips while I tape the form.

Sources

THREADS Magazine: Teach Yourself to Sew, fall 2010,  pg 33-35.

Friday, October 29, 2010

New Toys

Today I went to Joanne’s because I heard they were having a sale with lots of good prices. I’ve wanted/needed a rotary cutter for quite some time, but it never occurred to me that I could use it to cut out my patterns until I read a thread at StitchersGuild.  Anyways, I purchased a OLFA  kit which comes with a 45mm rotary, a 18 mm rotary, and a 12x18 self healing mat. Regular price was $42.99, but I got it for $25 since Joann’s was having a 40% of rotary cutters sale. I also picked up some dritz universal machine needles which I haven’t used before.  I hope that they will work ok in my phaff’s.
My newest hobby is now knitting. Last night I taught myself how to cast on, knit stitch and seed stitch. I’m attempting to make a sweater vest that has a single button in the front, ribbing down the front, and around the hemline. I’ve only gotten 2” of the 14” I need to make the back piece though. This will be a long journey…

Tuesday, October 26, 2010

I got my blog up and running. Now I just have to learn to use the thing. Bare with me for a few weeks while I learn all the bells and whistles. I’ve been working on quite a few different projects lately. The last item I’ve actually finished is a Halloween embroidery project. The satin lays flat, it looks wrinkled in this photo but it's completely flat, and ready to be hung:) The design was stitched onto muslin, I then resewed it to another piece of muslin for support, and then stitched the quilt backing, front sashes, and then attached the satin back. Then I reinforced all stitches to give the back a quilted look. My way is different than the way Jan told us to do it, but it still worked out.

Here is the completed photo.
It was an easy project for sure. The project was offered to compusew group members by the group owner Jan. She has the design and project directions in her store for sale located  here.  I loved how well the designs embroidered out. It was really quite a smooth project that didn't take very long. If  you do embroidery and own 3d, 4 or 5d , embird or another type of embroidery software i'd highly reccomend joining her yahoo group. It's been worth it to me since i'm learning pfaff's 3d embroidery system.
~Emily